The Perfect 4th
This is a continuation of past 3 blogs on intervals.
You can check those blogs here:
The Study of Musical Intervals Part 1
The Study of Musical Intervals Part 2: The 2nd Interval
The Study of Musical Intervals Part 3: The 3rd Interval
This week we’ll discuss the 4th intervals.
The perfect 4th interval is a half step larger than the major 3rd.
This is the 4th interval because there are 4 letter names involved from the lower to the higher note.
The interval distance between the notes is 2 and a ½ steps, which adds up to 5 frets from note to note.
As always: this intervallic distance corresponds to the same number of keys on a piano
A major scale has SIX Perfect 4th intervals:
This interval occurs in all the locations where there is a half step involved over 4 notes.
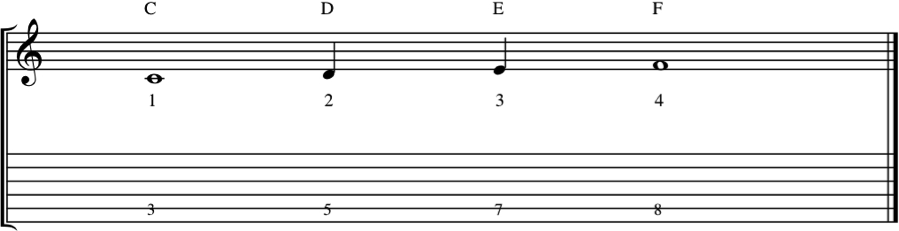
- On the 1st scale degree (In the key of C this is C-F, which has the E-F half step involved)
- On the 2nd scale degree (In the key of C this is D-G, which has the E-F half step involved)
- On the 3rd scale degree (In the key of C this is E-A, which has the E-F half step involved)
- On the 5th scale degree (In the key of C this is G-C, which has the B-C half step involved)
- On the 6th scale degree (In the key of C this is A-D, which has the B-C half step involved)
- On the 7th scale degree (In the key of C this is B-E, which has the B-C half step involved)
Fingerings.
The following example shows how you play a Perfect 4th interval on 2 adjacent strings.
This fingering is the same on all string sets EXCEPT strings 2 and 3.
You could also play this interval with 1 finger flat covering 2 adjacent strings with one finger since both notes are on the same fret for 4th intervals.

Following guitar neck shows the fingering for major 2nds on the G and B strings.
On this string set, you do need 2 fingers to play the 4th interval.

Important!
Within the structure of a major scale;
The above fingerings are played on following scale degrees on the lower of the 2 strings:
- The 1st note in the scale.
- The 2nd note in the scale.
- The 3rd note in the scale.
- The 5thnote in the scale.
- The 6thnote in the scale.
- The 7thnote in the scale.
The only place in a major scale where a Perfect 4th interval does NOT occur is on the 4th note in the scale.
That is the only place where there is no half step involved over 4 notes: from F to B.
This interval is called an “augmented 4th” or tritone.
The Augmented 4th or Tritone.
A tritone is a half step larger than a perfect 4th.
Another name for this interval is Augmented 4th.
When you make a perfect interval larger, it becomes augmented.
The augmented 4th is a 4th interval as well: there are 4 letter names involved from the lower to the higher note.
This interesting, dissonant interval is called a “tritone” because the interval spans 3 whole steps (tri–tone).
This 3 whole step distance adds up to 6 frets from note to note. A tritone in other words cuts half of our
As always: the number of frets in this interval corresponds to the same number of keys on a piano.
In medieval times, the tritone interval was forbidden in music.
It was then called: “the Diabolus In Musica”. This is Latin and translated it means: “The Devil in Music”.
Due to the restless sound of this interval, which is also called “dissonance” or “tension”, the augmented 4th was associated with “evil”.
In addition: the dissonance of this interval makes it rather challenging to sing 2 notes a tritone apart.
Considering that music in the Medieval Ages was primarily vocal music (and liturgical), it is not hard to imagine how the monks in the monastery must have thought the devil was at work amongst them when part of the choir sang the interval sharp, another group of singers accidentally sang the interval flat, and a minority sang it accurately.
I’m sure the painfully dissonant sound produced when singing an already highly dissonant interval so out of tune, must have been painful enough to imagine the worst.
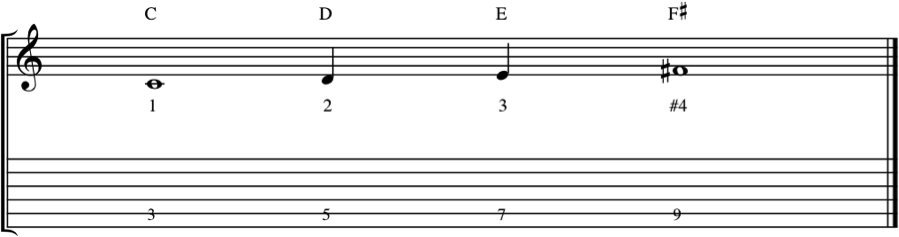
A major scale has ONE augmented 4th interval:
This interval occurs in the one and only location where there is NO half step involved over 4 notes.
On the 4th scale degree from the 4th to the 7th note (In the key of C this is F – B).
Fingerings.
The following example shows how you play an augmented 4th interval on 2 adjacent strings.
This fingering is the same on all string sets EXCEPT strings 2 and 3.

Following guitar neck shows the fingering for the augmented 4th on the G and B strings.

Important!
Within the structure of a major scale;
The above fingering is played on the following scale degree on the lower of the 2 strings:
- The 4th note in the scale. (In a C major scale: F – B)
Or in other words: between the 4th and 7th scale degrees.
To simplify the thought processes for improvising with 4th intervals, consider the following approach:
- The augmented 4th interval occurs on the 4th scale degree. Only 1 piece of information. Focus on that 1 scale note and…
- EVERYWHERE ELSE: use the other (Perfect 4th) fingering.
Here’s How You Practice This.
Solo over C major songs with 4th intervals, 1 string set at a time.
If your lowest note of the 2 notes you’re playing is F (4th note in the scale), you will use an augmented 4th fingering on that note.
If the note you’re on is one of the other 6 notes (C, D, E, G, A, B) in a C major scale, you will use the perfect 4th fingering.
Practice 3 minutes soloing on every string set.
This adds up to a 15-minute daily drill.
If you’re still unsure how to practice this: check the video in a past blog on intervals to see a description of how to practice intervals.
The Study of Musical Intervals Part 2: The 2nd Interval
Next week we’ll cover a different topic to give you more time to work on all the interval information we covered today and in past blogs.
In 2 weeks we’ll have a look at 5th intervals.
Conclusion
Hit me up anytime at [email protected] if you have any questions, or if you would like to book a lesson.
These free lessons are cool, but you will never experience the progress, joy, and results that my students experience in lessons when you’re learning by yourself from blogs and videos.
That is why people take lessons: way better results and progress, much more complete information, exposed to way more creative ideas than you can get from a blog or YouTube video.
There is only so much that self-study can accomplish.
If you want to see amazing results and progress in your guitar playing, buy your first lesson here and get started ASAP.
- 1 Lesson = 75

You’ll impress your friends and loved ones in no time with your guitar playing!
Consider donating any small amount to help me keep this blog going.
Thank you for your support!
 (13 votes, average: 5.00 out of 5)