Musical Intervals: The Building Blocks of All Harmony and Melody.
An interval is a distance between 2 sounds.
Many students tend to get confused about what makes up an interval.
Is it a number of frets? A number of steps?
Let’s clear up this confusion right away:
An interval is named after the number of letter names that are involved.
From A to E for example, is called a “5th”, because it takes 5 fingers to count from the letter A to the letter E. (A B C D E)
Students spend a lot of time in music schools on the study of intervals.
The theory of musical intervals is an important part of music theory because intervals are the building blocks of music.
After all: a melody is: Sounds at different intervals played one after another in time. (Horizontal writing)
And a chord is: Sounds at different intervals stacked on top of one another and played simultaneously. (Vertical writing)
Since we only have 12 sounds in our music, we also only have 12 distances/intervals.
All 12 Intervals & Their Names Starting From C.
| 1 | 2 | 3 | 4 | 5 | 6 | 7 | 8 |
| C | D | E | F | G | A | B | C |
- C – Db → minor 2nd: 1/2 step
- C – D → major 2nd: 1 step
- C – Eb → minor 3rd: 1 1/2 step
- C – E → major 3rd: 2 steps
- C – F → Perfect 4th: 2 1/2 steps
- C – F# → Augmented 4th = tritone = 3 whole steps
C – Gb → Diminished 5th = tritone = 3 whole steps - C – G → Perfect 5th: 3 1/2 steps
- C – Ab → minor 6th: 4 steps
- C – A → major 6th: 4 1/2 steps
- C – Bb → minor 7th: 5 steps
- C – B → major 7th: 5 1/2 steps
- C – C → Octave (8): 6 whole steps.
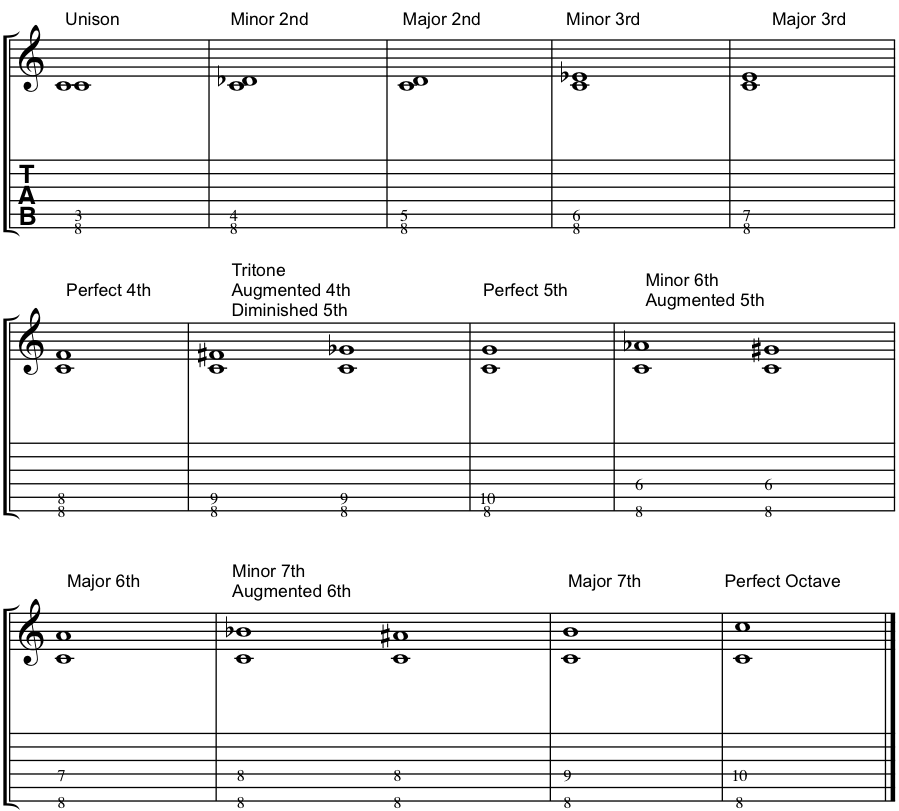
Here’s how all these intervals look like on staff and tablature. The tablature also shows how the intervals are played on 2 strings.
The Unison: Theoretically Speaking Not An Interval.
A unison is technically speaking not an interval, as there is no distance between the 2 notes.
It is really 2 versions of the same note played simultaneously.
In many theory books, the unison is not even mentioned.
This probably can be explained by the fact that most music theory books use the piano as a foundation to explain music theory.
Every note only appears once on a piano.
On a guitar, most notes appear numerous times on different strings, which makes it possible to play unisons.
They look like this:
On every string set except the G and B string set.

And like following on the G and B strings

Intervals Can Be Played One of 2 Ways.
- Melodically:
One note after another as a melody. You can play the notes on 1 string, or on multiple strings. - Harmonically:
Both notes played together as harmony. In this case, it is necessary to play both notes on 2 different strings so you can ring them together.
The shape and fingering for each interval look EXACTLY the same on each set of 2 adjacent strings, EXCEPT on strings 2 and 4. All 12 interval fingerings look different on these 2 strings only. (Later more about this)
Organization of All Intervals..
It helps to organize all intervals in 7 groups. (If these groups don’t make sense, it all will in the next couple of pages)
In a major scale you have:
- Unisons and octaves:
• SEVEN unisons and octaves: one on every note in the scale. - Seconds:
• TWO minor 2nds (on the III and VII in the scale), and
• FIVE major 2nds (on the other 5 notes in the scale) - Thirds:
• THREE major 3rds (On I, IV, and V) and
• FOUR minor 3rds (on II, III, VI and VII) - Fourths:
• ONE Augmented 4th (on IV) and
• SIX Perfect 4ths on the other 6 notes in the scale - Fifths:
• ONE Diminished 5th (on VII) and
• SIX Perfect 5ths on the other 6 notes in the scale - Sixths:
• THREE minor 6ths (on III, VI and VII) and
• FOUR major 6ths (on I, II, IV and V) - Sevenths:
• TWO major 7ths (on I and on IV) and
• FIVE minor 7ths (on the other 5 notes)
You only have 7 sets of intervals to learn/practice.
When learning 3rds for example, you will play through a scale combining both major and minor 3rds as they appear in the scale.
The Reason Why Fingerings Look Different On the G & B String.
All following string sets on a guitar are tuned in 4ths from low to high:
- E string to A string: E F G A
A string to D string: A B C D
D string to G string: D E F G
B string to E string: B C D E
Because all these string sets are tuned in the same intervallic distance, the shape and fingerings for each of the 12 intervals are the same on all these string sets.
This means you only have to learn 1 interval shape and fingering for each interval.
A major 3rd looks the same on all these string sets, so does a perfect 4th or a minor 2nd, and so on.
You only have to learn 1 fingering for each interval, and you can play that interval on every string set.
However: The 2nd and 3 strings on a guitar are tuned differently.
G string to B string: G A B
That is a major 3rd interval.
A major 3rd interval = 2 whole steps distance between the 2 notes
A perfect 4th = 2 ½ steps distance.
The G And B String Tuning
The G and B strings are tuned a half step more narrow than all other adjacent strings.
As a result, on a G & B string, you have to make all your interval fingerings physically a half step (1 fret) larger than on the other string sets, to compensate for missing a half step between these open strings.
What does that mean: “make the fingering a half step larger”?
It means that you have to move the note on the B string 1 fret higher (towards the guitar body) so you physically make the distance between the notes on the G and B strings 1 half step larger.
If you don’t do so; then your interval fingering will sound a half step smaller (more narrow) than on all other string sets.
Meaning: a major 3rd fingering on the note C gives you the notes C and E, which has exactly the same visual shape and fingering on each string; but using that same fingering on the G and B string will give you the notes C and Eb (an interval that is a half smaller because the tuning between those 2 strings is a half step smaller).
Conclusion.
That is a great deal of info to digest.
Memorize all this and hit me up in the comments section below if you have any questions about any of this.
Stay tuned!
Next week we will cover how all those fingerings look like on a guitar on every string set.
Hit me up anytime at [email protected] if you have any questions, or if you would like to book a lesson.
These free lessons are cool, but you will never experience the progress, joy, and results that my students experience in lessons when you’re learning by yourself from blogs and videos.
That is why people take lessons: way better results and progress, much more complete information, exposed to way more creative ideas than you can get from a blog or YouTube video.
There is only so much that self-study can accomplish.
If you want to see amazing results and progress in your guitar playing, buy your first lesson here and get started ASAP.
- 1 Lesson = 75

You’ll impress your friends and loved ones in no time with your guitar playing!
Consider donating any small amount to help me keep this blog going.
Thank you for your support!
 (13 votes, average: 5.00 out of 5)