Guitar Rock Improvisation Thoughts, Tricks, Concepts and Techniques, 6th Episode.
If you would like to revisit the prior blogs in this series, here they are:
Rock Guitar Soloing Episode 1
Rock Guitar Soloing Episode 2
Rock Guitar Soloing Episode 3
Rock Guitar Soloing Episode 4
Rock Guitar Soloing Episode 5
If you are ready to continue into the new material, here we go.
We are covering a lot of ground today.
Triad arpeggios
The chapter on arpeggio fingerings is vast. You spend a lot of time on this in music schools.
We will cover arpeggio fingerings in later blogs later this year or early 2016.
For now, let’s stick with arpeggiating simple triad (3 note) chord shapes on the top 3 strings, as an example.
Once you get the idea, you can always branch out from there.
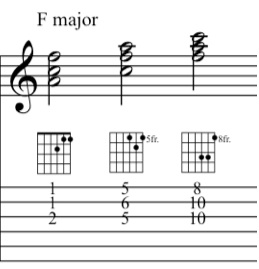
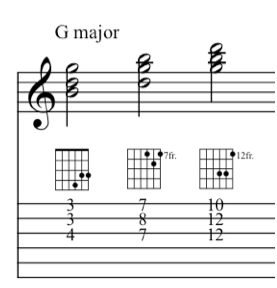
We’ll use the following chord shapes. You want to learn these triad fingerings if this is new to you.

Let’s say now, that you solo over the most common chord progression, I IV V in the key of C, your chords then are:
| C | C | F | G ||
Over the C chord: you can arpeggiate notes from the 3 C triad shapes.
Over the F chord: you can arpeggiate notes from the 3 F triad shapes.
Over the G chord: you can arpeggiate notes from the 3 G triad shapes.
Only comment: in order to make it sound like a solo, you don’t want to sustain the notes over into one another.
You want to lift up your finger after every note, so the notes sound one after another, as in a solo… not one over another, as in a chord.
You don’t want to make it obvious that you are using chord shapes to solo with.
Scroll down to watch the video showcasing this.
Arpeggio substitutions
This concept requires a great deal of theoretical understanding which is far beyond the scope of this blog.
This doesn’t mean that you can’t already explore this at some level.
You are basically using the idea of the previous topic discussed above.
However: instead of arpeggiating the notes of a G chord over G, you are instead using notes of a different chord than the one you are improvising over.
For example: using the notes of a Dm chord to solo over a G chord.
Examples of cool things you want to try out:
- Solo using the notes of an Am chord over a C chord.
- D minor notes over a 1 chord groove in G (G chord)
- E minor notes over a 1 chord groove in G (G chord)
- D minor notes over a 1 chord groove in C (C chord)
- D minor over a 1 chord groove in F (F chord)
- Alternating between D minor and E minor notes over a 1 chord groove in G7 (G7 chord)
And more advanced examples:
- Notes of C# and D# triads over G7 groove.
- E major triad notes over a C groove.
There are way more possibilities, but the above should get you going for a while.
Pent substitution
This in itself, is a big chapter that should be its own blog.
What it comes down to, is that you play another pentatonic scale than the one that is most common or expected.
For example:
On a C chord, most guitar players would naturally use the A minor pentatonic scale.
Experiment, improvising with
E minor pentatonic
D minor pent
B minor pent.
over a C chord.
Over Dm, use
Dm pent
Am pent
Em pent.
Over G7, experiment using Bb minor pentatonic.
Then, to top it all off, try this:
over chord progression: Cmaj7 | Cmaj7 | Dm7 | G7alt ||
solo using the following scales:
Bm pent over the Cmaj7 chord
Am pent over Dm chord
Bbm pent over the Galt chord (Galt means G7b9, G7#9, G7b5 or G7#5)
This sounds really cool.
The chords go up in 4ths, but the scales meanwhile move up in half steps.
Make your time/placement “elastic”
I already talked about deliberately playing behind the beat.
This is taking that idea a step further: Drag notes behind the beat, push notes in your phrases ahead of the beat.
Try to play everywhere, except on the beat. 🙂
To my students who have a hard time getting this concept, I often say: “Try to deliberately play rhythmically “wrong”.. not “rhythmically nice””.
My students inspired me to add this to the list here.
More often than not, people who are learning to solo, in the beginning, play nothing but perfectly even quarter notes and eighth notes, all nicely placed on the beat.
The message here is: don’t get locked into the rhythm section.
Speak your phrases rhythmically freely over the rhythmic grid the rhythm section provides.
You can speak your notes and phrases wherever you feel like over that grid.
Focus on cool rhythmic combinations
Meaning: don’t play constant 8th notes or 16ths.
This might seem obvious, yet it is amazing how very often I hear guitar players (or students) play phrases that lack rhythmic creativity.
It’s all too common to hear solos where too many phrases in a row, consist of perfectly even eight notes only.
This sounds unnatural because no-bo-dy-e-ver-talks-like-that.
Keep in mind: you’re telling a story when you solo. Soloing is communication.
I already touched upon this a couple of times in previous blogs in this series.
“It’s not good enough to play all the “right” notes: you also want to do rhythmically interesting things with them.”
Some of the things you can do:
- Combinations of 8ths, 16ths, 32nds.
- Add triplets, quintuplets, sextuplets, ….
- Tied notes.
- Syncopations
- Rests
- Speeding up and slowing down notes.
- Play with the durations/lengths of the notes.
- Etc.
You quite literally are talking with your guitar, and rhythm is an important aspect of this.
Conclusion
That is yet again, a lot of info to digest.
A lot of cool stuff was covered this week.
Exciting to see what is going to be on the menu for the upcoming week.
Hit me up anytime at [email protected] if you have any questions, or if you would like to book a lesson.
These free lessons are cool, but you will never experience the progress, joy, and results that my students experience in lessons when you’re learning by yourself from blogs and videos.
That is why people take lessons: way better results and progress, much more complete information, exposed to way more creative ideas than you can get from a blog or YouTube video.
There is only so much that self-study can accomplish.
If you want to see amazing results and progress in your guitar playing, buy your first lesson here and get started ASAP.
- 1 Lesson = 75

You’ll impress your friends and loved ones in no time with your guitar playing!
Consider donating any small amount to help me keep this blog going.
Thank you for your support!
 (7 votes, average: 5.00 out of 5)